Tip
Looking for a managed solution? Notifuse Cloud takes care of hosting, security, backups, updates, and maintenance for you — starting from $16/month.
Getting started
Notifuse includes an interactive Setup Wizard that makes installation easy. Many environment variables are optional and can be configured through the web interface on first launch.
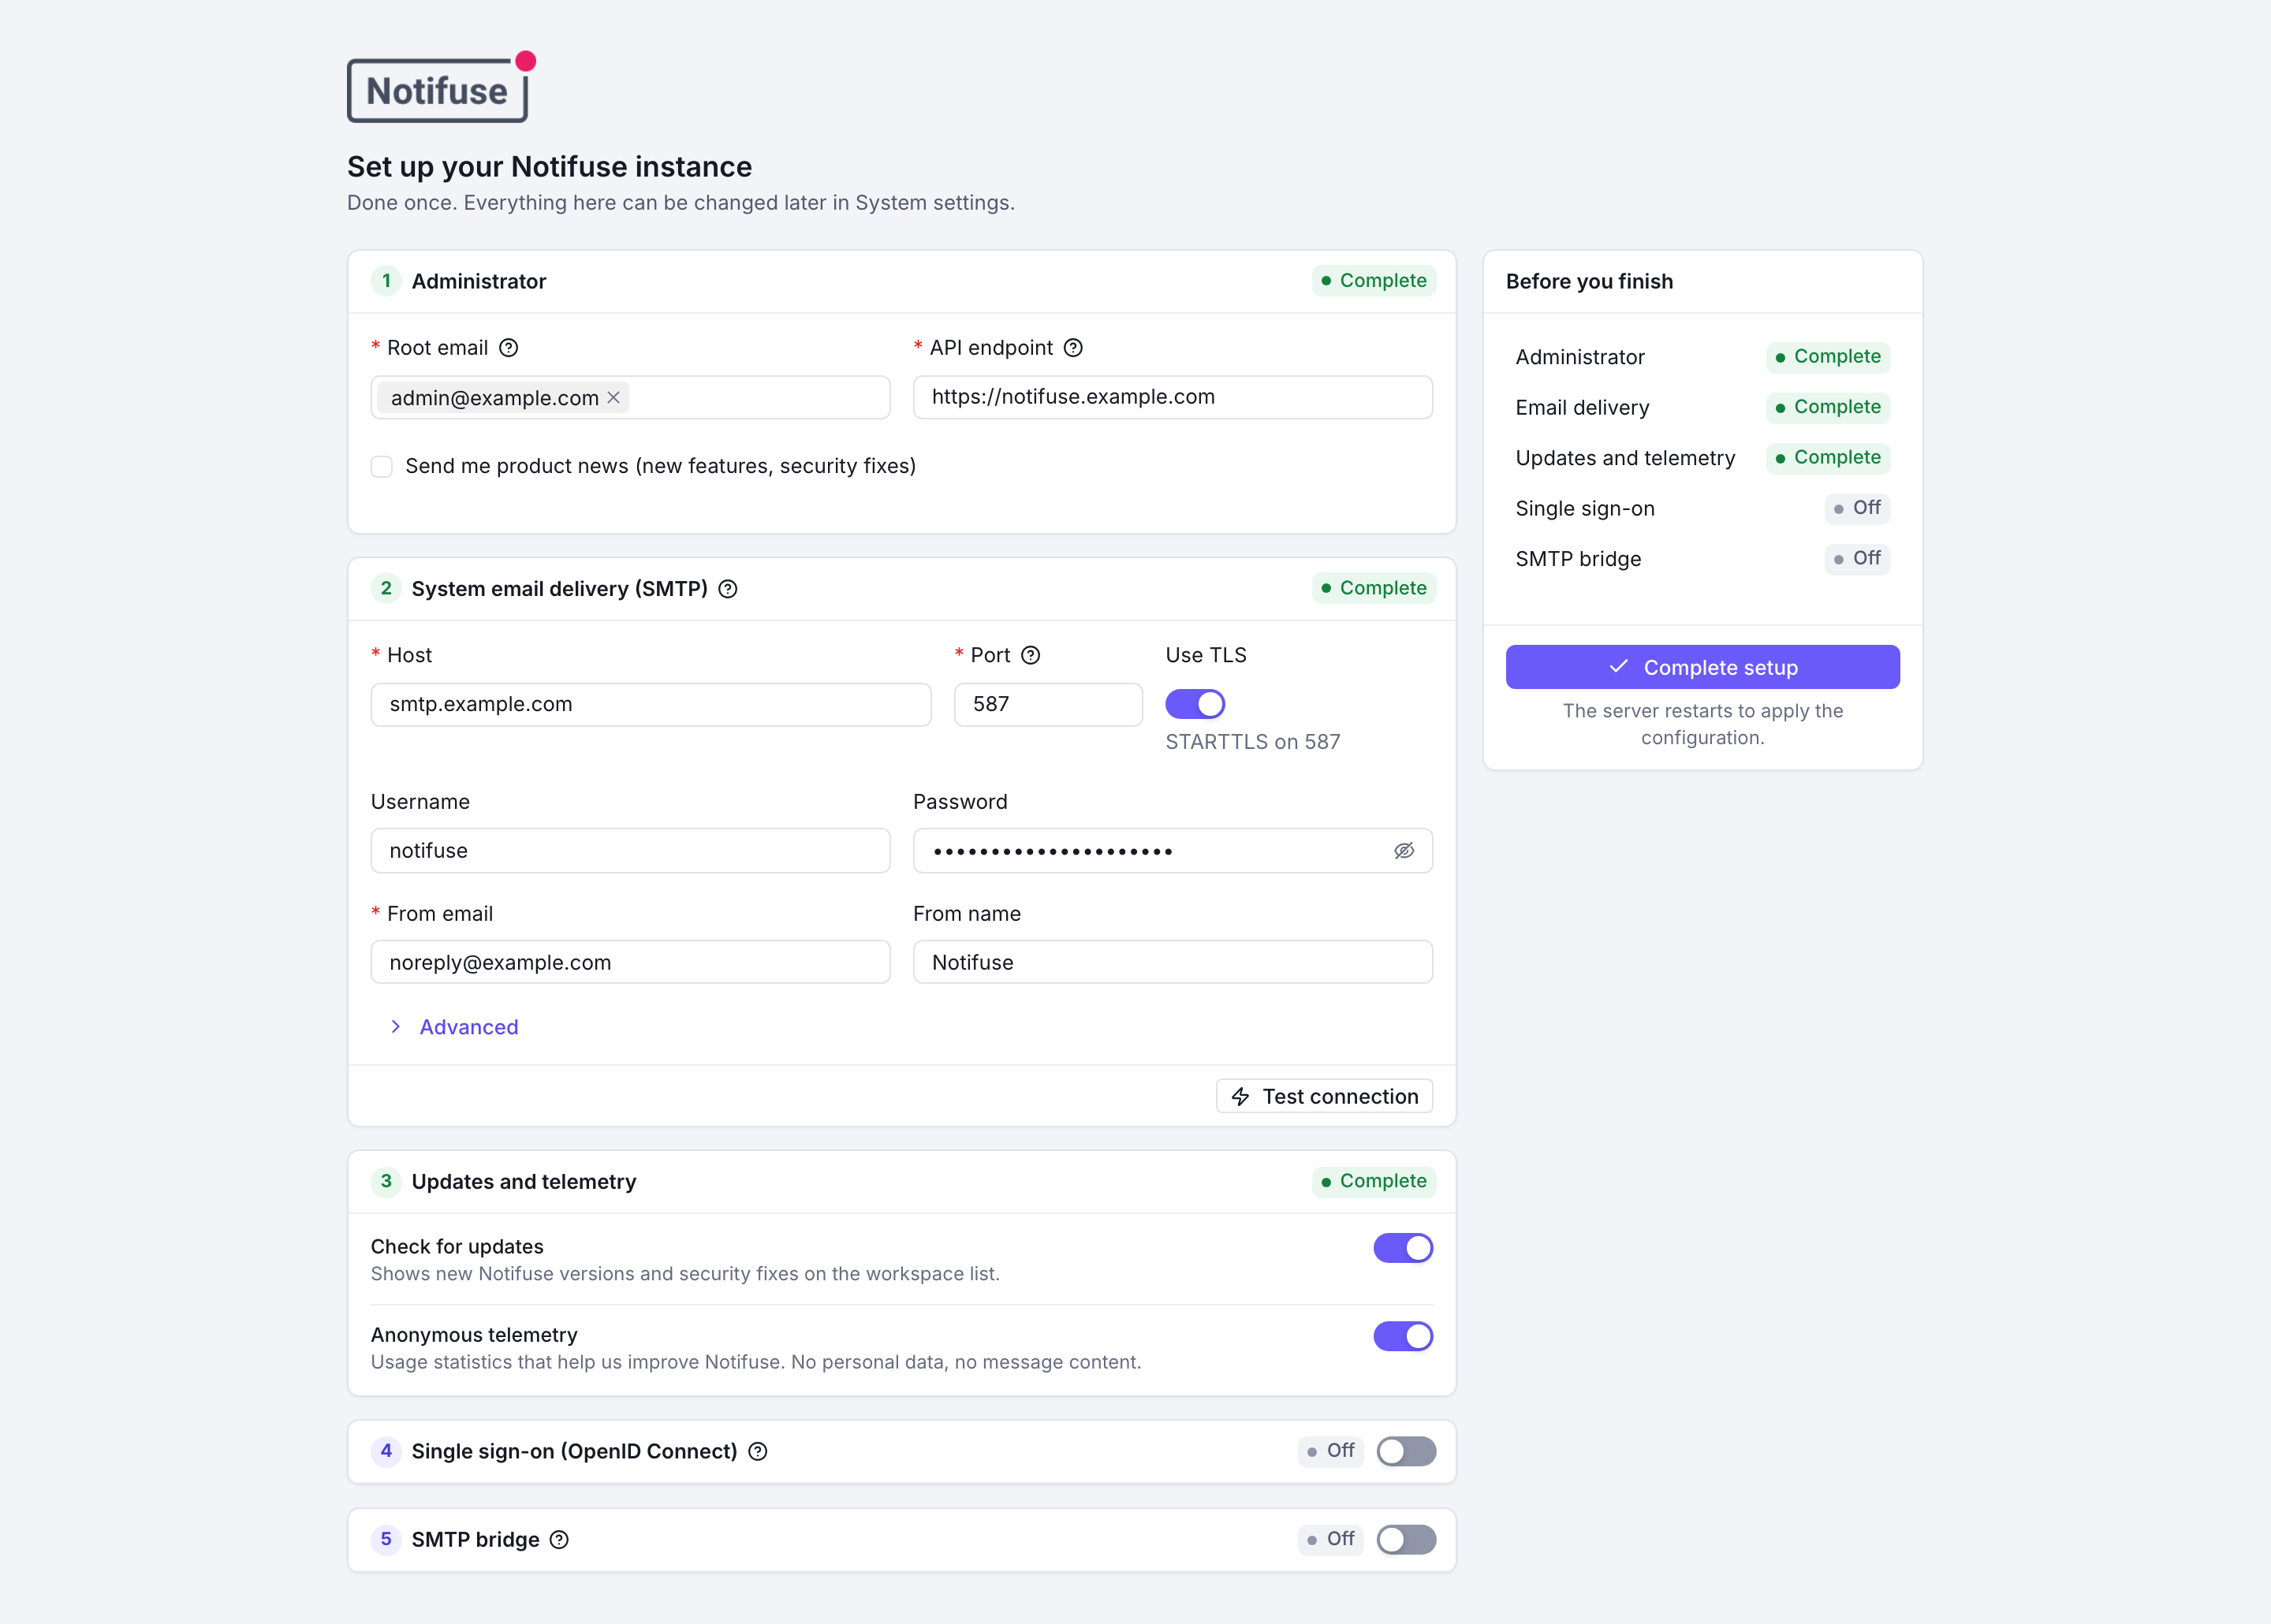
Quick Start with Setup Wizard
- Deploy Notifuse using one of the options below
- Access your instance in a web browser
- Complete the Setup Wizard:
- Enter your root administrator email (one or more)
- Check the API endpoint, prefilled with the address of the page
- Set up the SMTP server that sends sign-in codes and invitations, and test the connection
- Keep or turn off update checks and anonymous telemetry (both on by default)
- Optionally, set up single sign-on (OpenID Connect) and the SMTP bridge
- Start using Notifuse!
A setting already given by an environment variable is shown locked in the wizard, with the name of the variable; the wizard does not ask for it.
Option 1: Docker Compose (Recommended)
compose.yaml runs Notifuse with its own PostgreSQL 18. The file works on its own: a server needs no clone of the repository, only Docker Engine 25.0 and Compose v2.24 or newer (docker compose version).
Warning
These steps set up a new installation. To upgrade one that already runs, keep its .env (and the SECRET_KEY in it): a new key on its own leaves your stored data unreadable. See Upgrading. An installation that started from compose.yaml before version 42.0 without setting SECRET_KEY runs on a default that Notifuse now refuses: Replacing the secret key gives it, and the change to make.
mkdir notifuse && cd notifuse
curl -fsSL https://raw.githubusercontent.com/Notifuse/notifuse/main/compose.yaml -o compose.yaml

# Generate the secret key and the database password once, and keep them:
# the key encrypts your stored data. An existing .env is left alone.
test -e .env || cat > .env <<EOF
SECRET_KEY=$(openssl rand -base64 32)
DB_PASSWORD=$(openssl rand -hex 24)
EOF

docker compose up -d
This starts Notifuse on port 8081, with PostgreSQL reachable from the server itself only (127.0.0.1:5433). On first launch, you’ll be guided through the Setup Wizard to configure your instance. Alternatively, you can configure environment variables in the .env file: every variable in it reaches Notifuse.
Notifuse serves plain HTTP: put a reverse proxy with TLS in front of it before pointing a domain at it, and set HTTP_BIND=127.0.0.1 in .env when that proxy runs on the same server.
Warning
Compose names the database volume after the directory that holds compose.yaml (notifuse_postgres-data here). Keep that directory name: in a renamed or moved directory, docker compose up -d starts a new installation on an empty database. docker compose down -v deletes the database.
Upgrading a Docker Compose installation
Read the changelog entries between your version and the new one, back up, then download the new release’s compose.yaml over yours (or set NOTIFUSE_VERSION=v44.0 in .env to choose the release) and run docker compose up -d.
Version 44.0 moves compose.yaml to PostgreSQL 18: the first docker compose up -d copies your PostgreSQL 17 data to a second volume, then upgrades it. Upgrading PostgreSQL explains what happens, how to check it and how to roll back.
From a clone of the repository
The same file builds Notifuse from source in a clone: docker compose up -d --build, or docker compose watch to rebuild on every change. Without --build, it runs the image published for the release the file names; a release not published yet, on the dev branch, is built from the checkout. Up to version 43, compose.yaml always built from the checkout.
Option 2: Standalone Docker (Production)
For production deployments, use the standalone Docker image with your own PostgreSQL database:
# Generate SECRET_KEY once with: openssl rand -base64 32, and keep it: it encrypts your stored data
docker run -d --name notifuse -p 8080:8080 \
  -e SECRET_KEY=<your secret key> \
  notifuse/notifuse:latest
On first launch, you’ll be guided through the Setup Wizard to configure your instance. Alternatively, you can configure environment variables.
Note: You’ll need to provide your own PostgreSQL database.
PostgreSQL database (Option 2 only)
If using the standalone Docker option, you can use any PostgreSQL database with root credentials. Notifuse automatically creates a system database for itself.
Version: PostgreSQL 17 or higher (Notifuse refuses to start on an older server); compose.yaml ships PostgreSQL 18
A new database will be created for each Notifuse workspace to avoid multi-tenant issues (that’s why you need root credentials).
Note: This is not required when using Docker Compose as PostgreSQL is included.
An SMTP server
Notifuse needs an SMTP server to send system emails (e.g. password reset emails, invitation emails, etc.).
If using SES, you can create SMTP credentials in the SMTP settings section of the SES dashboard.
A public API endpoint
Notifuse needs a public API endpoint to be accessible from the web. Example: https://emails.yourcompany.com
Behind a reverse proxy, forward the original Host header to Notifuse, or set X-Forwarded-Host to it. Web versions of emails open only on the domain their link was sent with and on API_ENDPOINT. A proxy that replaces Host with its upstream address, and sets no X-Forwarded-Host, makes every web version unavailable; one that replaces it with the API_ENDPOINT host lets every custom domain show every workspace’s web versions.
Environment Variables
With the Setup Wizard, many environment variables are optional and can be configured through the web interface. Environment variables always take precedence over database settings when present.
Warning
Special Characters in .env Files
If you’re using a .env file and any of your values contain the # character (common in passwords), you must wrap the value in quotes:
# ✅ CORRECT - value is quoted
DB_PASSWORD="mypass#word123"
SMTP_PASSWORD="smtp#pass456"

# ❌ INCORRECT - will be truncated at the # character
DB_PASSWORD=mypass#word123   # parsed as "mypass"
SMTP_PASSWORD=smtp#pass456   # parsed as "smtp"
This limitation only applies to .env files. Environment variables set directly in your shell, Docker Compose, or container orchestration platform do not have this restriction.
Required Variables
| Variable | Description |
|---|---|
DB_HOST | PostgreSQL host (e.g., localhost or db.yourcompany.com) |
DB_PORT | PostgreSQL port (e.g., 5432) |
DB_USER | Database username (e.g., postgres) |
DB_PASSWORD | Database password (e.g., postgres) |
SECRET_KEY | Secret key for encryption and signing (generate with command below) |
Generate SECRET_KEY:
openssl rand -base64 32Notifuse refuses to start with a SECRET_KEY that gives less than 32 bytes.
Warning
IMPORTANT: Never replace your SECRET_KEY with a new value on its own. It encrypts all workspace
integration secrets (email provider API keys, SMTP passwords, etc.), which a new key alone cannot
read. To change it, follow Replacing the secret key.
Replacing the secret key
SECRET_KEY can list several keys separated by commas (a comma that is part of a key is written
twice). The first key encrypts and signs; the others only let Notifuse read the data stored under them.
When Notifuse starts with a list, it re-encrypts that data with the first key, in a single transaction,
before serving anything. To replace your key:
- Generate a new key with
openssl rand -base64 32. - Put it first and your current key after it:
SECRET_KEY=<new key>,<current key>. If your current key contains a comma, write that comma twice, and if it starts or ends with one, put a space between it and the comma that separates the keys (SECRET_KEY=<new key>, ,,<rest of the key>). A version before 42.0 reads the whole list as a single key: when you upgrade to 42.0, set the list in the same step. - Stop every Notifuse instance, then start them all with that value. An instance still running with the current key alone cannot read the data the others re-encrypted, and an instance running the list cannot read what such an instance writes until the next start with the list.
- Once every instance runs with that value, set
SECRET_KEYto the new key alone, without quotes or spaces around it: a single key is used exactly as written. If it opens none of the stored workspaces (or, while none is stored, none of the encrypted system settings), Notifuse does not start.
If the key of a workspace, or a credential it uses, opens with none of the listed keys, Notifuse does not start, changes nothing, and names that workspace. An encrypted system setting that none of them opens (an SMTP credential or the OIDC client secret saved in the setup wizard, the SMTP bridge TLS certificate or key) is left as it is and named in a warning in the startup logs, and Notifuse runs without it: to keep it, list the key it is encrypted with. Notifuse does not start, and names the setting, when single sign-on or the SMTP bridge is on and needs it, or when no workspace is stored yet and none of those settings opens.
Replacing the key signs everyone out. API keys must be deleted and created again, pending invitations
must be sent again, and scripts that call user.rootSignin sign with the new key. An API client that
saves an integration with the encrypted credentials it read before the change is refused until it reads
the workspace again. Database backups taken before the change still need the former key. Data kept in
each workspace’s database, such as message history, is encrypted with that workspace’s own key and is
not affected.
Warning
Before version 42.0, compose.yaml provided a default SECRET_KEY and env.example a placeholder.
Notifuse refuses to start when the first key of SECRET_KEY is one of those values or gives less than
32 bytes, and reads a single comma as a separator between keys: if your key contains a comma, write
each of its commas twice when you upgrade. If your installation runs with one of those values, replace
it as above, keeping it after the new key, in the same step as the upgrade to 42.0. If you started from
compose.yaml without setting SECRET_KEY, your current key is the former default:
# Put the output of openssl rand -base64 32 before the comma
SECRET_KEY=<new key>,d04zCk3Fa45oOjDWHpAvc1AZxnLdGffOnNWK+Jt2yXf37+FTfuMMHb8flcfPMqLluRR3rvhbr555r6j1DEigrA==
Application Variables (Optional with Setup Wizard)
These variables can be configured via the Setup Wizard on first launch, or set as environment variables. Environment variables always override wizard settings.
| Variable | Description |
|---|---|
ROOT_EMAIL | Root administrator email (e.g., admin@yourcompany.com). Accepts multiple comma/semicolon-separated emails to grant root to several administrators (e.g., alice@yourcompany.com,bob@yourcompany.com); matching is case-sensitive. |
API_ENDPOINT | Public API endpoint URL (e.g., https://emails.yourcompany.com). To move to another domain later, see Changing your domain. |
SMTP_HOST | SMTP server host (e.g., smtp.gmail.com) |
SMTP_PORT | SMTP server port (e.g., 587 or 465) |
SMTP_USERNAME | SMTP username (e.g., noreply@yourcompany.com) |
SMTP_PASSWORD | SMTP password (e.g., your_smtp_password) |
SMTP_FROM_EMAIL | From email address (e.g., noreply@yourcompany.com) |
SMTP_FROM_NAME | From name (e.g., Your Company Name) |
SMTP_EHLO_HOSTNAME | Custom EHLO hostname for SMTP connections (e.g., mail.yourdomain.com). Defaults to SMTP host value when empty. Useful when SMTP servers reject EHLO localhost. |
Note
Multiple root users: ROOT_EMAIL can hold more than one email
(comma/semicolon-separated), so a shared instance can have several
administrators with root privileges — creating workspaces, accessing System
Settings, and authenticating programmatically. A user account is created for
each listed email on startup, so every root can sign in immediately. Matching
is case-sensitive, and a single email behaves exactly as before. The Setup
Wizard establishes the first (primary) root; additional roots can be added
there as a list or via the ROOT_EMAIL environment variable.
Optional Variables
| Variable | Description | Default |
|---|---|---|
| Server Configuration | ||
SERVER_PORT | Port for the server to listen on (e.g., 8080) | 8080 |
SERVER_HOST | Host address to bind to (e.g., 0.0.0.0) | 0.0.0.0 |
CORS_ALLOW_ORIGIN | Origins allowed to call the API from a browser: *, one origin, or a comma-separated list (e.g., https://yourapp.com,https://admin.yourapp.com; lists need 41.1 or later). A restricted value must include every workspace custom domain, whose console and notification center call the API from their own origin. | * |
ENVIRONMENT | Environment mode (e.g., production) | production |
LOG_LEVEL | Logging level (e.g., debug or warn) | info |
| Database Configuration | ||
DB_PREFIX | Database table prefix (e.g., notifuse) | notifuse |
DB_NAME | Database name (e.g., notifuse_system) | ${DB_PREFIX}_system |
DB_SSLMODE | SSL mode for database (e.g., require or disable) | require |
DB_EXPECT_EXISTING | true refuses to create or initialise the system database, and to create a missing workspace database: set it on a server that must already hold the data (an upgrade, a restore), so that an empty PostgreSQL stops Notifuse instead of starting a new installation | false |
DB_MAX_CONNECTIONS | Total max connections across all databases (e.g., 100) | 100 |
DB_MAX_CONNECTIONS_PER_DB | Max connections per workspace database (e.g., 3) | 3 |
DB_CONNECTION_MAX_LIFETIME | Maximum lifetime of a connection (e.g., 10m) | 10m |
DB_CONNECTION_MAX_IDLE_TIME | Maximum idle time before closing connection (e.g., 5m) | 5m |
| Task Scheduler Configuration | ||
TASK_SCHEDULER_ENABLED | Enable internal task scheduler (e.g., true or false) | true |
TASK_SCHEDULER_INTERVAL | Task execution interval in seconds (e.g., 30) | 30 |
TASK_SCHEDULER_MAX_TASKS | Maximum concurrent tasks (e.g., 10) | 10 |
| Broadcast Configuration | ||
BROADCAST_DATA_FEED_ALLOW_PRIVATE_HOSTS | Allow broadcast data feeds to fetch from private, loopback, and link-local addresses. This disables SSRF protection for data-feed requests — only enable it in trusted deployments that intentionally fetch feeds from your internal network (e.g., true). | false |
EMAIL_QUEUE_CONCURRENCY | Emails each email integration other than SMTP sends at once for broadcasts and automations, per Notifuse instance, between 1 and 50 (e.g., 20; 42.0 or later). See Sending speed. | 10 |
EMAIL_QUEUE_SMTP_CONCURRENCY | The same for SMTP integrations, between 1 and 50 (42.0 or later). Raise it only if your SMTP server accepts several connections at once (e.g., 4). | 1 |
| Webhook Configuration | ||
WEBHOOK_DELIVERY_ALLOW_PRIVATE_HOSTS | Allow outgoing webhooks — webhook subscriptions and automation webhook nodes — to reach private, loopback, and link-local addresses. This disables SSRF protection for them — only enable it in trusted deployments that intentionally deliver webhooks to your internal network, such as n8n on the same Docker network (e.g., true). While it is off, outgoing webhooks connect directly and ignore HTTP_PROXY/HTTPS_PROXY. | false |
| Licence | ||
NOTIFUSE_LICENSE_KEY | A self-hosted licence key. Wins over a key pasted in the console. Not needed to run Notifuse. | - |
| Privacy Settings | ||
TELEMETRY | Send anonymous usage statistics (e.g., true or false) | true |
CHECK_FOR_UPDATES | Check for new versions (e.g., true or false) | true |
| SMTP Bridge Configuration | ||
SMTP_BRIDGE_ENABLED | Enable SMTP bridge server for transactional emails (e.g., true or false) | false |
SMTP_BRIDGE_PORT | SMTP bridge port (e.g., 587 for STARTTLS, 465 for implicit TLS) | 587 |
SMTP_BRIDGE_DOMAIN | Public domain name for SMTP bridge (e.g., smtp.yourdomain.com) | localhost |
SMTP_BRIDGE_TLS | TLS posture: starttls, implicit, or off (see below). Auto-resolves when unset. | auto |
SMTP_BRIDGE_TLS_CERT_BASE64 | Base64-encoded TLS certificate (required for starttls and implicit) | - |
SMTP_BRIDGE_TLS_KEY_BASE64 | Base64-encoded TLS private key (required for starttls and implicit) | - |
| Single Sign-On (OIDC) — see SSO guide | ||
OIDC_ENABLED | Enable Single Sign-On via OpenID Connect (e.g., true or false) | false |
OIDC_ISSUER_URL | IdP issuer URL, must be https (e.g., https://accounts.google.com) | - |
OIDC_CLIENT_ID | OAuth2 client ID from your identity provider | - |
OIDC_CLIENT_SECRET | OAuth2 client secret (encrypted at rest; never sent to the browser) | - |
OIDC_REDIRECT_URI | Callback URL registered at the IdP. Derived from API_ENDPOINT when empty. | <API_ENDPOINT>/api/user.oidc.callback |
OIDC_SCOPES | Space-separated scopes (openid always included) | openid email profile |
OIDC_BUTTON_LABEL | Sign-in button label | Sign in with SSO |
OIDC_AUTO_CREATE_USERS | Auto-create accounts on first SSO login (requires OIDC_ALLOWED_DOMAINS) | false |
OIDC_ALLOWED_DOMAINS | Comma/semicolon-separated email-domain allowlist gating auto-creation | - |
| Tracing Configuration | ||
TRACING_ENABLED | Enable tracing (e.g., true) | false |
TRACING_SERVICE_NAME | Service name for tracing (e.g., notifuse-production) | notifuse-api |
TRACING_SAMPLING_PROBABILITY | Sampling probability (e.g., 0.05) | 0.1 |
TRACING_TRACE_EXPORTER | Trace exporter: jaeger/zipkin/stackdriver/datadog/xray/none (e.g., jaeger or datadog) | none |
TRACING_JAEGER_ENDPOINT | Jaeger endpoint (e.g., http://jaeger:14268/api/traces) | http://localhost:14268/api/traces |
TRACING_ZIPKIN_ENDPOINT | Zipkin endpoint (e.g., http://zipkin:9411/api/v2/spans) | http://localhost:9411/api/v2/spans |
TRACING_STACKDRIVER_PROJECT_ID | Stackdriver project ID (e.g., my-gcp-project-id) | - |
TRACING_AZURE_INSTRUMENTATION_KEY | Azure Monitor instrumentation key (e.g., 12345678-1234-1234-1234-123456789012) | - |
TRACING_DATADOG_AGENT_ADDRESS | Datadog agent address (e.g., datadog-agent:8126) | localhost:8126 |
TRACING_DATADOG_API_KEY | Datadog API key (e.g., 1234567890abcdef1234567890abcdef) | - |
TRACING_XRAY_REGION | AWS X-Ray region (e.g., us-east-1) | us-west-2 |
TRACING_AGENT_ENDPOINT | General agent endpoint (e.g., monitoring-agent:8126) | localhost:8126 |
TRACING_METRICS_EXPORTER | Metrics exporter: stackdriver/prometheus/datadog/none (e.g., prometheus) | none |
TRACING_PROMETHEUS_PORT | Prometheus metrics port (e.g., 9464) | 9464 |
SMTP Bridge Configuration
The SMTP Bridge feature allows you to connect SaaS applications that only provide SMTP integration (like Supabase Auth, Firebase, Auth0, etc.) to Notifuse. This gives you full control over email designs and branding using Notifuse’s MJML editor, instead of being stuck with default SaaS templates.
See SMTP Bridge usage documentation for examples of how to send emails once configured.
TLS Modes
The bridge supports three TLS postures via SMTP_BRIDGE_TLS:
| Mode | Description | Typical port |
|---|---|---|
starttls | Listens plaintext; clients must upgrade via STARTTLS before AUTH. Default when certs are provided. | 587 |
implicit | TLS-from-byte-1 (SMTPS). Required for clients that only speak implicit TLS. | 465 |
off | No TLS. Only safe when fronted by a TLS-terminating reverse proxy (HAProxy, Caddy layer4, stunnel, nginx Mail, Postfix) on a trusted network. | any |
When SMTP_BRIDGE_TLS is unset, Notifuse picks starttls if both cert and key are provided, otherwise off in development.
Warning
In production (ENVIRONMENT=production), the bridge refuses to start without TLS configured. You must either provide SMTP_BRIDGE_TLS_CERT_BASE64 and SMTP_BRIDGE_TLS_KEY_BASE64, or explicitly set SMTP_BRIDGE_TLS=off if you’re running behind a TLS-terminating reverse proxy.
Production Setup with Let’s Encrypt
For production deployments, use valid TLS certificates from Let’s Encrypt using certbot with DNS challenges.
Step 1: Install Certbot
# Ubuntu/Debian
sudo apt-get update
sudo apt-get install certbot

# macOS
brew install certbot

# CentOS/RHEL
sudo yum install certbot
Step 2: Generate Certificate with DNS Challenge
DNS challenge is recommended because it doesn’t require opening port 80 or 443, and works even if your SMTP server is on a different port.
# Generate certificate using DNS challenge
sudo certbot certonly \
  --manual \
  --preferred-challenges dns \
  --email admin@yourdomain.com \
  --agree-tos \
  -d smtp.yourdomain.com
When prompted, certbot will ask you to create a DNS TXT record:
Please deploy a DNS TXT record under the name
_acme-challenge.smtp.yourdomain.com with the following value:

XyZ123AbC456...

Before continuing, verify the record is deployed by running:
dig -t txt _acme-challenge.smtp.yourdomain.com
Step 3: Add DNS TXT Record
Add the TXT record to your DNS provider:
Type: TXT
Name: _acme-challenge.smtp
Value: XyZ123AbC456... (the value provided by certbot)
TTL: 300 (5 minutes)
Wait a few minutes for DNS propagation, verify with:
dig -t txt _acme-challenge.smtp.yourdomain.com

# Or using nslookup
nslookup -type=TXT _acme-challenge.smtp.yourdomain.com
Press Enter in certbot to continue once the record is verified.
Step 4: Encode Certificates to Base64
After certbot successfully generates the certificates, encode them to base64:
# Certificate location (typically):
# Certificate: /etc/letsencrypt/live/smtp.yourdomain.com/fullchain.pem
# Private Key: /etc/letsencrypt/live/smtp.yourdomain.com/privkey.pem

# Encode certificate to base64 (single line)
sudo cat /etc/letsencrypt/live/smtp.yourdomain.com/fullchain.pem | base64 -w 0 > cert_base64.txt

# Encode private key to base64 (single line)
sudo cat /etc/letsencrypt/live/smtp.yourdomain.com/privkey.pem | base64 -w 0 > key_base64.txt

# On macOS, omit the -w flag:
sudo cat /etc/letsencrypt/live/smtp.yourdomain.com/fullchain.pem | base64 > cert_base64.txt
sudo cat /etc/letsencrypt/live/smtp.yourdomain.com/privkey.pem | base64 > key_base64.txt
Step 5: Add to Environment Variables
Copy the base64-encoded values to your .env file:
SMTP_BRIDGE_ENABLED=true
SMTP_BRIDGE_DOMAIN=smtp.yourdomain.com
SMTP_BRIDGE_PORT=587
SMTP_BRIDGE_TLS=starttls
SMTP_BRIDGE_TLS_CERT_BASE64="<paste-cert-base64-here>"
SMTP_BRIDGE_TLS_KEY_BASE64="<paste-key-base64-here>"
Note
Certbot automatically sets up a renewal cron job. After certificate renewal, you’ll need to re-encode the certificates to base64 and update your environment variables.
Development Setup with Self-Signed Certificates
For local development, you can use self-signed certificates:
# Using the provided script
./scripts/generate-dev-certs.sh localapi.notifuse.com

# Or manually with openssl
openssl req -x509 -newkey rsa:2048 \
  -keyout dev-cert.key.pem \
  -out dev-cert.cert.pem \
  -days 365 -nodes \
  -subj "/CN=localhost" \
  -addext "subjectAltName=DNS:localhost,IP:127.0.0.1"

# Encode to base64
cat dev-cert.cert.pem | base64 > cert_base64.txt
cat dev-cert.key.pem | base64 > key_base64.txt
⚠️ Warning: Self-signed certificates are for development only. Never use them in production!
Configuration Management
Setup Wizard vs Environment Variables
- Setup Wizard: Ideal for quick deployments and testing. Configuration is stored securely in the database and can be managed through the web interface.
- Environment Variables: Recommended for production deployments. Provides better security for sensitive data and allows configuration management through your deployment pipeline.
- Priority: Environment variables always take precedence over database settings when both are present.
For Production Deployments: We recommend using environment variables for sensitive configuration (SMTP credentials, SECRET_KEY) and the Setup Wizard or admin interface for non-sensitive settings (API endpoint, etc.).
Programmatic Authentication
For CI/CD pipelines and automated deployments, a root user can authenticate programmatically using HMAC-SHA256 signature, bypassing magic link authentication. When ROOT_EMAIL lists multiple addresses, use any one of them as ROOT_EMAIL below — the signed email must exactly match one of the configured root emails.
#!/bin/bash
# Configuration
NOTIFUSE_URL="https://your-notifuse-instance.com"
SECRET_KEY="your-secret-key"  # the first key when SECRET_KEY lists several
ROOT_EMAIL="admin@example.com"
TIMESTAMP=$(date +%s)

# Generate HMAC signature
MESSAGE="${ROOT_EMAIL}:${TIMESTAMP}"
SIGNATURE=$(echo -n "$MESSAGE" | openssl dgst -sha256 -hmac "$SECRET_KEY" | awk '{print $2}')

# Authenticate and get JWT token
curl -X POST "${NOTIFUSE_URL}/api/user.rootSignin" \
  -H "Content-Type: application/json" \
  -d "{\"email\":\"${ROOT_EMAIL}\",\"timestamp\":${TIMESTAMP},\"signature\":\"${SIGNATURE}\"}"
The endpoint returns a JWT token for subsequent API requests. Timestamps must be within 60 seconds of server time, and requests are rate limited to 5 attempts per 5 minutes.
Third-party Hosting Platforms
Notifuse is also available on the following third-party platforms.
Warning
These platforms are not officially supported and often run outdated versions of Notifuse. For the latest version, automatic updates, and official support, use Notifuse Cloud.