
You end with your contacts on a Notifuse list, your unsubscribed and bounced addresses marked as such, and your templates rebuilt with Liquid.
Before you start
- A Notifuse workspace with an email provider connected.
- Access to your Mailchimp or Brevo account, to export contacts and templates.
- An account or API key with Contacts write and Lists write.
- A spreadsheet tool to split a CSV file by status.
Migrate your audience
Export your contacts
Export your audience as CSV from Mailchimp, or your contacts as CSV from Brevo.
Keep each contact’s status. Either export each status as its own file, or keep the status column so you can split the file yourself. You need three groups at the end:
- Subscribed contacts.
- Unsubscribed contacts.
- Bounced addresses and spam complaints (Mailchimp calls bounced addresses “cleaned”).
The Notifuse import has no status column, so the split decides what each contact ends up as.
Create the list
In the Contacts rail, click New list. Give it a Name and check the ID: it can’t be changed later, and the API and forms use it.
Imported contacts land on the list as active, even on a double opt-in list. They don’t get a confirmation email.
Pause any automation that welcomes new subscribers
Warning
A CSV import adds each contact to the list as a new subscription, which fires
list.subscribed. A live automation triggered on Subscribed for that list would enroll every imported contact and send each of them your welcome email.In Automations, open each automation triggered by the list and click Pause, then Yes, pause. A paused automation enrolls nobody, and it doesn’t catch up on the contacts imported in the meantime when you activate it again.
If you haven’t built your automations in Notifuse yet, build them after the import.
Import the CSV
Go to Contacts → All contacts and click Import, or open the list and click Import to list. The drawer has three steps: File, Columns and Import.
- File: drop the CSV. The first row must hold the column names, and one column must hold the email addresses.
- Columns: a column named exactly like a field (
email,Email,first_name,First Name…, in any case) is mapped for you. Map the others in Imports into, and leave the ones you don’t need on Don’t import. A Mailchimp column called “Email Address”, for example, has to be mapped to Email by hand. - Under Add to lists, pick your new list.
- Click the import button. It shows the number of rows, as in Import 1,250 contacts.
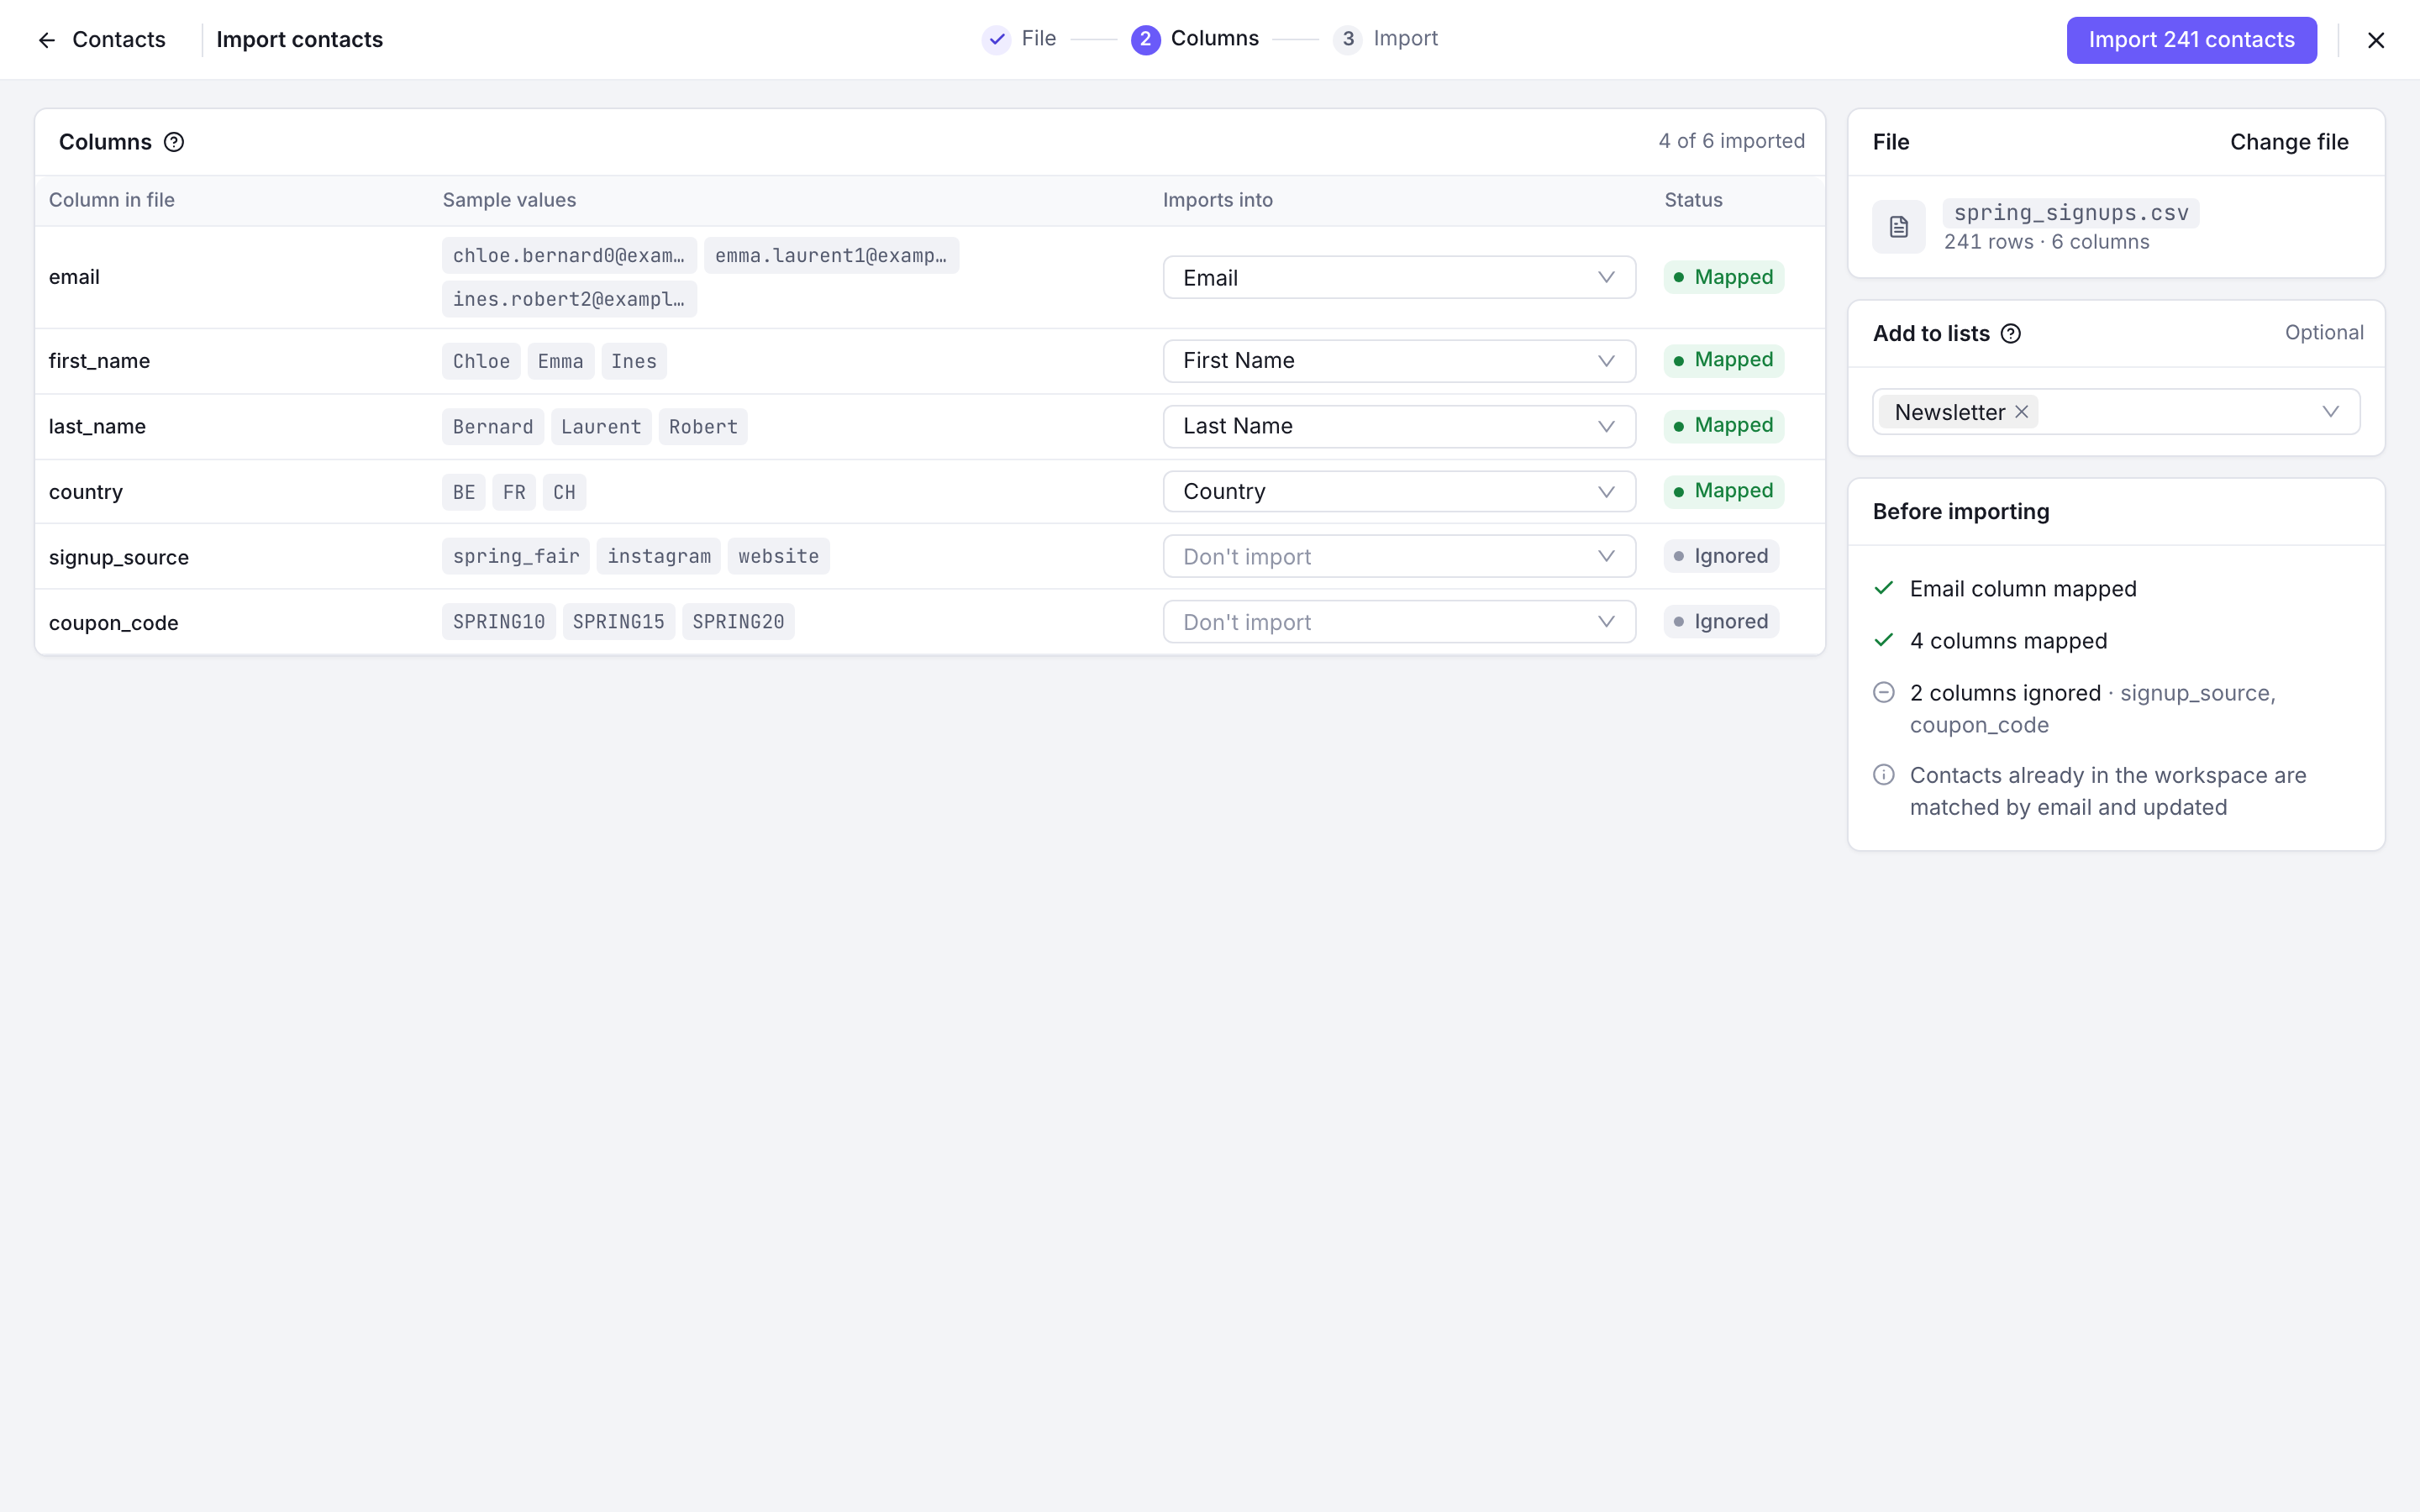
The Columns step of Import contacts: each CSV column mapped to a contact field, and a list picked in Add to lists Import every contact you want to keep, the unsubscribed ones included. Their status gets fixed in the next steps.
The import runs from your browser in batches of 100 rows. Keep the tab open. If it stops, drop the same file again to resume where it ended.
Fields that have no standard Notifuse field, such as a company or a plan, can go into custom fields. Set their names in the More actions menu → Manage custom fields.
Mark your unsubscribed contacts
In Contacts, open the More actions menu and choose Bulk update (CSV). The Bulk update from CSV drawer opens.
- Under Action, pick Unsubscribe from a list, then your list.
- Drop the CSV of unsubscribed contacts and check the Email column.
- Click the button that shows the count, such as Unsubscribe 312 contacts.
Notifuse never overwrites an unsubscribed, bounced or complained status during an import. Importing the same file again later won’t subscribe these contacts back.
Mark bounced and complained addresses
The console can’t set these two statuses. Use
POST /api/contactLists.updateStatus, one contact per call, on contacts that are already on the list. The key needs Lists write and Contacts write.curl -X POST https://YOUR_HOST/api/contactLists.updateStatus \ -H "Authorization: Bearer YOUR_API_KEY" \ -H "Content-Type: application/json" \ -d '{ "workspace_id": "YOUR_WORKSPACE_ID", "email": "old-address@example.com", "list_id": "newsletter", "status": "bounced" }'Use
"status": "complained"for spam complaints. Loop over your file and send one call per address.If you would rather not keep these addresses at all, leave them out of the import instead.
Rebuild your templates
Go to Templates and click New template. Pick the Editor mode: Visual or Code (MJML). It can’t be changed after the template is created.
The Import / Export menu imports JSON or MJML only. Notifuse has no HTML import, so a template exported as HTML from Mailchimp or Brevo has to be rebuilt, or pasted into a raw HTML block of the visual editor.
Rewrite the merge tags as Liquid:
- First name: Mailchimp’s
*|FNAME|*or Brevo’s{{ contact.FIRSTNAME }}becomes{{ contact.first_name }}. - Last name:
*|LNAME|*or{{ contact.LASTNAME }}becomes{{ contact.last_name }}. - The unsubscribe link becomes
{{ unsubscribe_url }}.
Check your own templates for other tags. Every contact field is available under
contact, and custom fields under their key, such as{{ contact.custom_string_1 }}.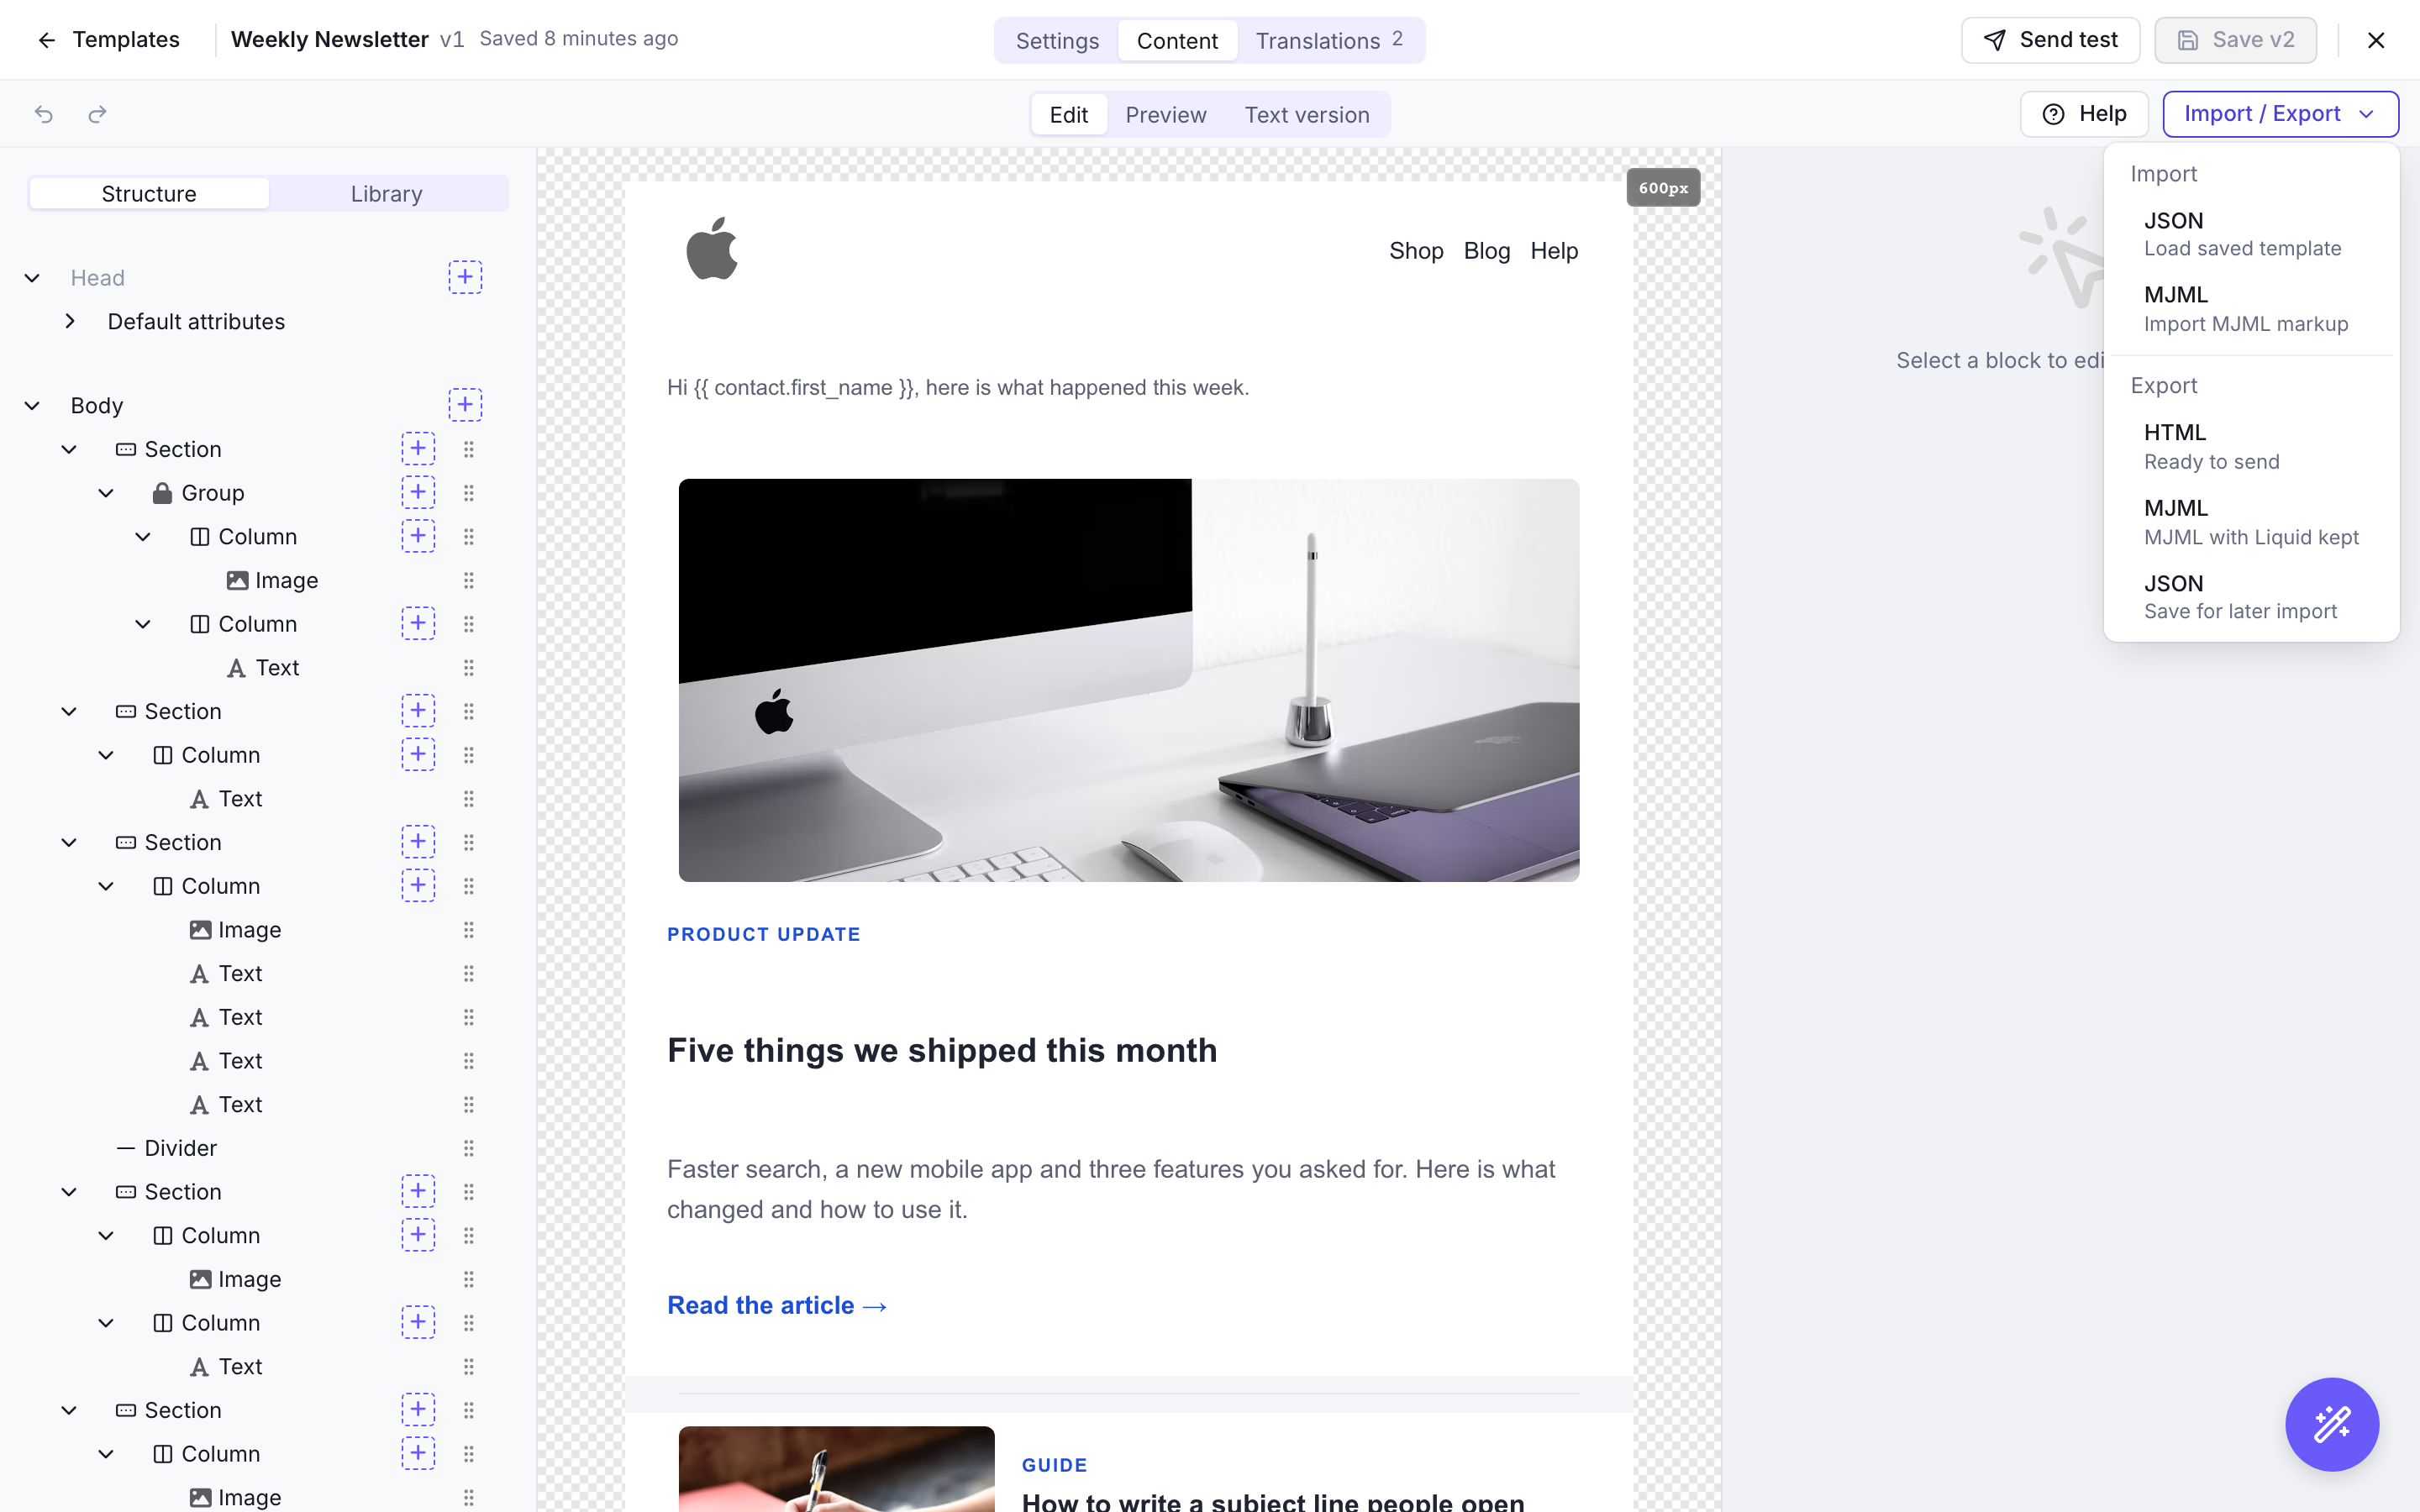
The Import / Export menu of the template editor: import JSON or MJML, export HTML, MJML or JSON - First name: Mailchimp’s
Turn your automations back on
Open each automation you paused and click Activate, then Yes, activate. From now on only new subscribers enter it.
Check that it works
- The list shows the number of contacts you imported.
- Open a contact you know was unsubscribed in your old tool. Its status on the list is unsubscribed.
- The paused automations show no new journeys for the imported contacts.
- Send a test of each rebuilt template to yourself and check that the names and the unsubscribe link come out right.